Simli cupcake nail art
(For English,
please scroll down and click the “Read in English” button at the end of this
post.”)
Herkese
merhabalar,
Bugün büyük
gün =) Benim doğum günüm!! Bu yüzden bugün tırnaklarımı keklerke süslemek
istedim. 31 gün 31 tasarımın bugünkü konusu ile birleştirince de ortaya simli
cupcake çıktı:
Ben
öncelikle tüm tırnaklarıma pembeye kaçan açık krem renkli bir oje sürerek
başladımİşaret ve yüzük parmaklarıma cupcake yaptım. Biri benim biri de geçen
hafta bugün doğum günü olan canım kocacım için =) Nasıl yapmışım bir bakalım:
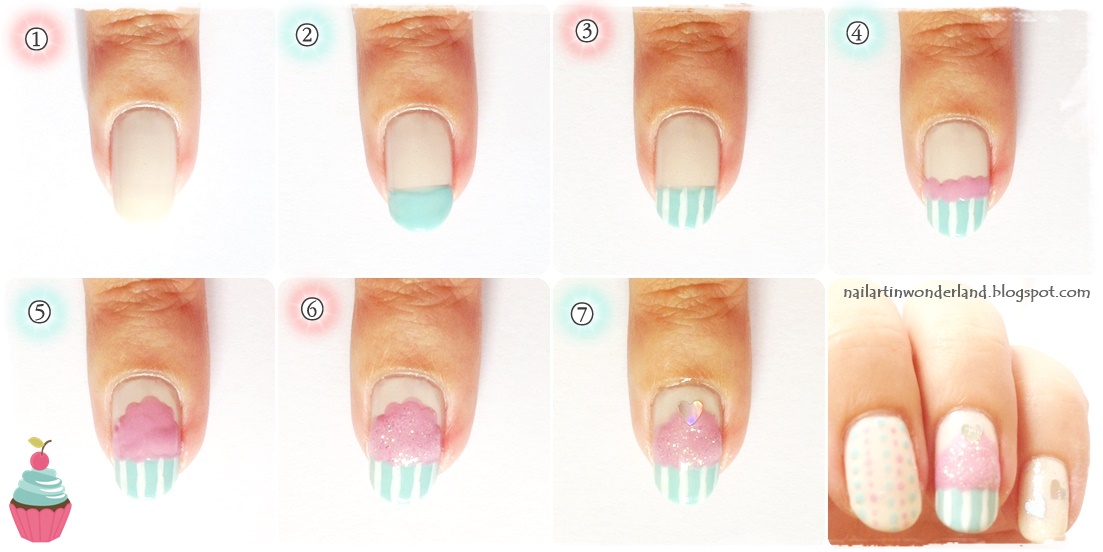
1. Az önce
de bahsettiğim gibi, temek rengimizi sürerek başlıyoruz.
2. Tırnak
uçlarımızı nane yeşili de denen açık yeşil bir renk ile boyuyoruz. (Tırnağınızın
yaklaşık 1/3’ünü boyamanız yeterli.) Ben ojenin içindeki fırçayı kullanarak
yaptım, ama siz daha kolay olduğunu düşünüyorsanız önce ince bir çizgi çekip,
sonra alt kısmını doldurabilirsiniz.
3. Yeşil
kısma dik beyaz çizgiler çiziyoruz.
4. Büyük boy
bir noktalama aletiyle (yada tel toka) aşağıdaki resimde de görüldüğü gibi yan
yana pembe noktalar yapıyoruz.
5. Cupcake
şeklini verene kadar da yukarıya doğru noktalar yapmaya devam ediyoruz.
6. Pembe oje
kuruduktan sonra, üstüne simli bir oje uyguluyoruz. Ben bunun için bir önceki
aşamada kullandığım noktalama aletimi ve içinde minik altın rengi simler olan
bir ojeyi kullandım.
7. Son
olarak buradaki yazımda bahsettiğim kalp
şeklindeki küçük pullardan koydum cupcake’in üstüne. Bunun için şeffaf bir
ojeden kalbi yerleştirmek istediğim yere azıcık uyguladım ve kalbi ojeye yapıştırdım.
Eğer böyle pullarınız yoksa kürdan ve oje kullanarak kendiniz de kolayca kalp
yapabilirsiniz. Oje ile kalp yapmayı öğrenmek için, daha önceden hazırlamış olduğum
buradaki minik videoyu izleyebilirsiniz.
Cupcakelerden
sonra, orta parmağım ile devam ettim. Noktalar yapmak istedim. Çok minik
yapmışım noktaları =) Yine de sevdim. Şöyle yapılıyor:
1. Ana
rengimizi sürüyoruz.
2. Cupcake
yaparken kullandığımız açık yeşil oje ile üç paralel şerit halinde noktalar
yapıyoruz. Noktaların büyüklüğünü dilediğiniz gibi ayarlayabilirsiniz.
3. Yine
cupcake’i yaparken kullandığımız pembe ile, boşluklara iki şerit halinde pembe
noktalar yapıyoruz. Böylece üç tırnağımızı tamamlamış oluyoruz.
Son olarak,
küçük ve başparmaklarım kaldı. Onlara parlaklık katmak istedim ve bu yüzden de:
1. Bu
aşamayı artık biliyoruz =) Temel rengimizi uyguluyoruz.
2. Cupcake’te
kullandığımız simli ojemizi uyguluyoruz.
3. Her iki
tırnağımıza da ikişer tane kalp yapıp/yapıştırıp manikürümüzü tamamlıyoruz =)
Keklerimi
beğendiniz mi? Renkleri nasıl buldunuz? Ben bu renkleri çok yumuşak ve tatlı
bulduğum için seçtim. Kullandığım ojeler:
Pastel 04
(Beyaz)
Golden Rore
Paris 254 (Yeşil)
Rival de Loop
Young 29 Start Dust (Sim)
Golden Rore Paris 218 (Pembe)
Pastel 27 (Krem)
Umarım
tasarımımı beğenmişsinizdir. Son hali böyle görünüyor:
İşte ben de
doğum günümü böyle kutluyorum. Siz nasıl kutlarsınız? =)
Sevgiler,
Alice
(Sıradaki desen: Yarım ay)
Glitter cupcake nail art
Hello
everyone,
Today is the
big day =) It’s my birthday!! That’s why, I wanted to make cupcake nails and
combine it with today’s challenge: Glitter. There I had these beautiful glitter
cupcake nails:
Let’s move
on with the tutorial. I started by
painting all of my nails a pinkish nude color. On my pointer and the ring
finger I made cupcakes. One for me, one for my lovely husband whose birthday
was just one week ago. Here is how to do it:
1. As I
mentioned above, apply your base color.
2. Paint the
tips of your nails a minty green color. (You paint about 1/3 of your nails.)
Here I just used the brush which comes with the polish bottle, but you can draw
a thin line first and fill it in if you think it is easier.
3. Draw
vertical white stripes on the green part.
4. With a
large size dotting tool (or a bobby pin) make pink dots as you see in the
picture below.
5. Continue
making dots to form the shape of the cupcake.
6. When the
pink polish dries, apply glitter polish on it. To do this I used the same
dotting tool I just used to make my cupcake, and the glitter polish I use has a
lot of tiny gold glitters in it.
7. Lastly I put
a heart shaped holographic glitter piece on my cupcake. (I mentioned these
studs(?) in this post.) To do this I simply
dabbed a little clear polish where I want to place the heart, and put the heart
there. If you do not have such studs, you can make a heart using a toothpick
and polish. To learn how to make hearts, you can watch the short video I prepared before.
After the
cupcakes, I moved on with my middle finger. I wanted to make dots on it. I
ended up doing very tiny dots, but oh well. I like them =) To do this:
1. Just
apply your base coat.
2. Use the same
green color that you used for the cupcake and make three parallel lines of
dots. The size of the dots depends on your taste.
3. With the
pink you used for the cupcake, make another two lines of dots and your middle
finger is also ready.
Finally, I
wanted to add some shine to my pinky and thumb. So:
1. You know
that step already =) Apply your base color.
2. Apply the
same glitter polish you used on the cupcake.
3. Lastly, add
two hearts to match the ones on the cupcake. And you’re done!
Do you like my
cupcakes? What do you think about the coloor choice? I chose these colors
beacuse I think they are soft and girly. The polishes I used are:
Pastel 04
(White)
Golden Rore
Paris 254 (Green)
Rival de
Loop Young 29 Start Dust (Glitter)
Golden Rore Paris 218 (Pink)
Pastel 27 (Nude)
I hope you
like this design. This is the final look:
This is how
I celebrate my birthday. How do you celebrate yours? =)
Love,
Alice
(Next
design: Half moon)


Hiç yorum yok:
Yorum Gönder